Part 4 in a series. Click here for Part 1; Part 2; Part 3.
Ironing used to be a big thing. Back in the day, my mother had a huge basket of weekly ironing. It included not only my Dad's white work shirts, which she starched, but his cotton boxer shorts (which, presumably, she did not).
Ironing clothes is high on my list of truly odious domestic chores. Ah, but ironing fabric yardage is another game altogether, and one of my favorite phases of the quilt making process. That brings me to my first tip for this week, which is actually not a tip so much as a rule.
Ironing clothes is high on my list of truly odious domestic chores. Ah, but ironing fabric yardage is another game altogether, and one of my favorite phases of the quilt making process. That brings me to my first tip for this week, which is actually not a tip so much as a rule.
Always press before cutting.
To pre-wash or not to pre-wash? Both approaches have their adherents. Personally, I'm a dedicated pre-washer. For one thing, washing every bit of fabric before it enters my stash means ironing it, which means spreading it out on my ironing board, caressing it, examining it, admiring it .... Fellow fabric-lovers, you know what I'm talking about.
So the fabric gets washed, then ironed, then folded and filed away. Sometime later (maybe years later), it comes back into the light of day to be cut.
At this point, those storage folds are persistent creases. If I'm cutting a strip across the whole width, I don't have to unfold it, so that's fine. But as soon as I need to unfold to make a cut, those creases have got to be pressed out.
For scraps, which may have been sitting in a big crumpled jumble in a bag, the pre-cut pressing is even more urgent.
Sure, it all gets flattened under your transparent ruler, right? Not good enough. Press it.
Always press seams before sewing across them.
Some quilters like to keep a small ironing table right next to their machines so they don't have to keep jumping up to go to the ironing board. Being a fidgety type, I prefer the variety of sit-to-sew, stand-to-press. Either way, don't skip pressing your pieced strips before joining them to the next patch. Finger pressing doesn't do it. You need that whole strip nice and flat. See Part 2, Aligning, to understand why.
Press seams to one side.
Does this really need to be said? Don't all quilters press their seams to one side? Actually, not. There are a few mavericks out there who press seams open. I suppose there may be occasions when it helps to distribute bulk, but it places more stress on the seam, and shortens the life of the quilt.
Press seams towards the darker fabric.
The reason usually given for this rule is that the seam allowances won't show through the darker fabric. That's true. More importantly, habitually pressing towards the darker fabric will almost always keep your seam allowances leaning in opposite directions when joining two pieced strips.
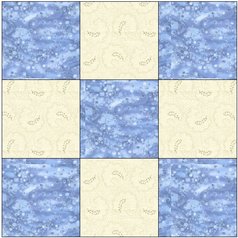
Patchwork quilting depends on value contrast for its effect. It's the contrast of relative light and dark between two adjacent patches that makes them appear as distinct shapes.
Patchwork quilting depends on value contrast for its effect. It's the contrast of relative light and dark between two adjacent patches that makes them appear as distinct shapes.
|
The 9-Patch block at the left uses high value contrast between each adjacent square, creating a clear checkerboard effect. If all the seam in the block are pressed towards the darker fabric, the directions of the seam allowances will alternate.
|
Of course, there are exceptions. The next pressing tip overrides this one.
Press seams away from greater bulk.
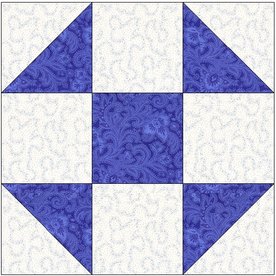
Look what happens when your simple 9-Patch block adds a few half-square triangles (HSTs) and turns into a Shoo Fly block.
|
If you press both the bias seams and the straight seams towards the darker fabric, you'll get a concentration of seam allowance bulk right in the triangle corners. That's going to wreak havoc with your quest for perfect points. |
|
Since you'll be sewing and pressing the HSTs first, you'll probably press the bias seams toward the dark, then press the straight seams towards the light. No problem, until it's time to join the top and bottom strips to the center strip. If you followed the rule and pressed those seams towards the center dark square, the seam allowances won't alternate.
For this, we need one more tip ...
For this, we need one more tip ...
Plan ahead.
The more complex your quilt block, the more certain you are to encounter seam allowance conflicts. Before you set up your assembly line, sew and press one complete block to work out your seam allowance strategy. Then apply that consistently to each component of each successive block.
Make yourself a quilt-worthy ironing board.
Standard ironing boards are designed for ironing clothes. They're just not big enough to spread out an entire 45-inch width of quilters' cotton. Plus, they offer very limited real estate for stacking the dozens of fabrics I pull out of stash to audition for a new quilt. For that, I needed a board big enough to land a jet, so I made my own.
Here's my everything-at-a glance schematic of how it's done.
Here's my everything-at-a glance schematic of how it's done.
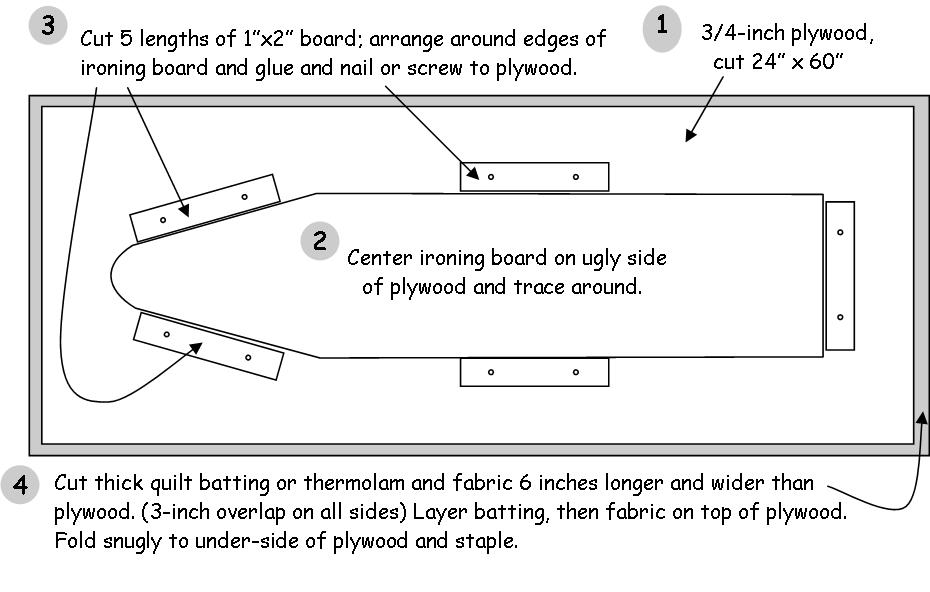
I made mine 24 x 60 inches. You can make yours a bit bigger or smaller if you like. Much bigger will start to become unsteady, perched on top of your regular ironing board.
The lengths of lumber that surround the ironing board to hold it in place can be any old thing, as long as it's about 1 inch thick. Cut them anywhere from 6 to 12 inches long. Carpenters wood glue will hold them in place without nails or screws, but the nails/screws hold them steady while the glue dries. Be sure your nails/screws aren't long enough to go all the way through the board!
To staple the cover to the board, spread your fabric and batting on the floor and lay the board on top of it, then fold the cover around the board and staple.
I've seen the suggestion that 1-inch gingham check makes a good cover. Not a bad idea, but know that (a) the checks aren't actually 1 inch, (b) the checks aren't square and (c) the gingham you'll find among the quilters' cottons is not generally a sturdy fabric.

 RSS Feed