|
All your attention to the details when cutting and aligning will set the stage for a precision piecing performance. Sewing the seam is where you seal the deal. In this article, I'll give you my favorite sewing machine strategies.
|
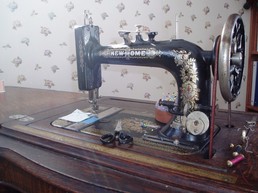
"Sylvia," my New Home antique treadle machine.
|
1. Ease on the Bottom
The concept of ease, while familiar in garment construction, doesn't come up often in patchwork quilting. After all, the pieces of a quilt block are supposed to fit together exactly. Unfortunately, in the real world, that doesn't always quite work out.
In Part 1, Cutting, I talked about fabric grain, and in Part 2, Aligning, observed how mis-matched edge grain will feed through the machine at different rates of stretch. You can think of stretch as being the opposite of ease. In patchwork piecing, ease is the technique to use to counter-act the distorting effect of stretch.
To achieve the small amount of ease required to correct to the problem of grain distortion, use this amazingly simple trick. If you are joining two strips, one cut on the unyielding straight grain, and one on the stretchier cross grain, always put the stretchier piece on the bottom. Likewise, a bias edge should always be the under-layer.
Here's how it works: as your fabric passes under the presser foot and over the feed dogs, the feed dogs pull it along while the presser foot pushes back, effectively accelerating the bottom fabric. The effect is enough to ease in a bit of extra fullness without pinches or puckers, very useful in garment sewing. For quilters, it's a handy trick for curved piecing.
2. Keep Your Points Cozy

Whether you're sewing a simple 4-patch block or a challenging Mariner's Compass, getting the intersecting seams ("points") to line up exactly is the Holy Grail of precision quilt piecing.
With seam allowances pressed in opposite directions (more on pressing next week), it's easy to feel the seams nestle together as you align the patches for sewing. The tricky part is keeping them nestled in that perfectly cozy embrace as they glide through the sewing machine.
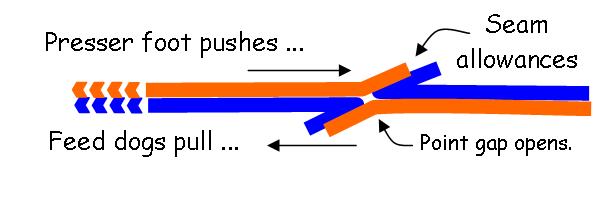
Here again, that push-pull effect of presser foot and feed dogs can either work with you or against you. The two diagrams below show your alternatives in sending the pieced patches through the machine. (Visualize your fabric in cross-section, traveling from right to left.)
In the first example, the seam allowances on the top patch are pressed away from the presser foot. You're less likely to have the seam allowances bunch up (at least on top), but look what happens to your nestled seams ... like Romeo and Juliet, they're subject to forces pulling them apart. It's a quilting tragedy in the making.
Ah, but if you lean the seam allowances the other way, those same push-pull forces work to tighten the join, and a perfect point emerges. Don't you love a happy ending?
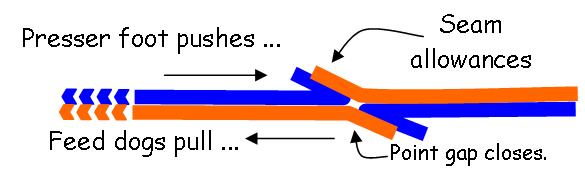
Now, I recognize that once your seams are leaning a certain way, flipping the fabric over will not change that. But, as the saying goes, fore-warned is fore-armed. My next tip hints at a way to compensate ...
3. Slow down!
When I started using an antique treadle machine for all my quilt piecing, I noticed right away that my piecing precision improved. The reason? At its fastest, the treadle is still slower than an electric machine, giving me time focus on all the details.
At a slower speed, I also discovered that I can safely sew over pins, a very risky practice at high speeds. If your sewing machine needle comes down squarely on a pin, a bent pin is not your only worry. You also dull the needle, and possibly even break it. Plus, a tiny fugitive fragment of broken needle can seriously damage your machine. I still don't advocate sewing over pins in general, but for some tricky point intersections, being able to leave the pin in place is a big advantage.
At a slower speed, I also discovered that I can safely sew over pins, a very risky practice at high speeds. If your sewing machine needle comes down squarely on a pin, a bent pin is not your only worry. You also dull the needle, and possibly even break it. Plus, a tiny fugitive fragment of broken needle can seriously damage your machine. I still don't advocate sewing over pins in general, but for some tricky point intersections, being able to leave the pin in place is a big advantage.
4. Measure the seam, not the seam allowance
The more complex your quilt block, the more it will shrink if you over-estimate your 1/4-inch seam. Remember, it isn't the seam allowance that counts, it's the whole seam. That includes not only the seam allowance, but the width of the thread in the stitching line.
That, "in the stitching line," bit is important. While the vintage Singer Featherweight is famous for its nearly-perfect straight stitch, in reality, every sewing machine slants its stitches at least a tiny bit. The result is that the stitching line will always be just a bit wider than the thickness of the thread alone. How much wider will vary by machine.
There's still one more element to add to the seam: the thickness of the fabric. Different fabrics have different thread counts, that is, the number of threads that are woven into an inch. A high thread-count fabric will be woven from finer thread and will be thinner than a fabric with a lower thread count. If that sounds like a silly consideration to you, think about an intersection of six (or more!) points. The multiple layers of fabric involved in the seam start to add up.
Especially if your quilt block is a complex one with lots of seams, it's worth testing your seam width. Cut five 1-inch squares and sew them together end to end. After pressing all seam allowances to one side, the strip should measure exactly 3 inches. Or, if 1-inch squares are too finicky, make them 2 inches. Then you'll get an 8-inch strip. Keep testing and adjusting until it's perfect, then mark it on your throat plate with tape.
Stay Tuned for Part 4 of Indispensable Tips for Precision Quilt Piecing.
Next week, I'll wrap up this series with a few tips on pressing, PLUS how to make your own aircraft-carrier sized pressing table.

 RSS Feed