• Blog
  • Home
  • My Story
  • Patterns
  • Tools
  • Contact Us
 

Mystery Quilt, Part 8:  Happy Ending, or Going to the Dogs?

1/22/2009

2 Comments

 
New to this series? Go to Part 1 here.
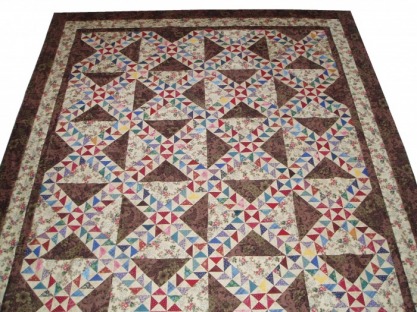
Finally, this quilt top is done.  I've been quite in suspense about it, waiting to see if it would actually be worth quilting.  

What if it was so ugly I'd have to donate it to the local animal shelter to use for dog bedding? ..... No, it couldn't be that bad.  

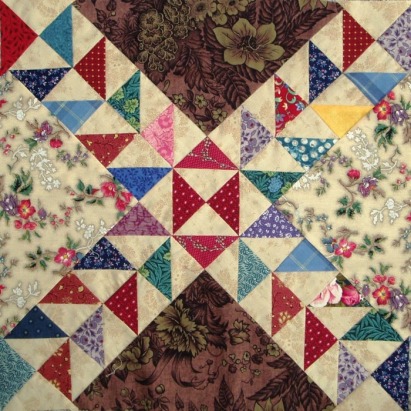
Once I added a border, I started liking it much better. So I added two more. What do you think? I think it's a keeper.    

I love the way borders set off a quilt, like putting a picture in a frame. And I really love multiple borders. What I do NOT love is math, so I made myself a handy-dandy spreadsheet to crunch the numbers for me. I can plug in the size and number of my blocks, and widths of up to 10 borders, and instantly see how the quilt grows, how many strips to cut for each border, and how much yardage I'll need. Sure, I can do most of that in EQ, but I don't like EQ yardage estimates for borders. I always cut my borders across the width of the fabric and piece the strips with diagonal seams, so I wanted the yardage calculated specifically for that method. Also, it's really handy to know how many strips to cut before I start cutting.  

Click here for my nifty Quilt Border Calculator.  If you want to use the border calculator, click the link, then click SAVE. Otherwise, you won't be able to save your own calculations. It will only work if you have Excel on your computer. I'm still trying to figure out a way around that, but I'm not terribly hopeful. Maybe I should ask my brother, who is a genuine techie nerd. Every family needs one, ya know?

Please, please, please, let me know if you discover any bugs in it, or if you have suggestions for improvements.
2 Comments

Mystery Quilt, Part 7:  The Plot Thickens

1/14/2009

0 Comments

 
New to this series? Go to Part 1 here.
Old Maid's Ramble.

That's the name of the block, not a summary of Jane Eyre's story, though it could be.  After all, unlucky Jane did quite a bit of rambling as a lonely young woman, if not actually an old maid, before she finally won her Rochester in the end.  

I've seen other blocks by this name, as well as this block done differently.  In my version, the small triangles sit on top of the large triangles like a crown, pointing towards the center of the block.  This is the way it's done in the antique quilt in Maggi McCormick Gordon's American Folk Art Quilts.  This is a gorgeous book, not a pattern book, but an album of fabulous antique quilts, with commentary by my favorite quilt historian.  The book includes piecing directions for blocks from several of the quilts, but gets the piecing of Old Maid's Ramble wrong (one strip of bias squares points the wrong way ... and besides, the colors of the sample are even uglier than mine!).  No matter;  I LOVE this book.

The other alternative is pictured in Maggie Malone's must-have book of quilt blocks, 5,500 Quilt Block Designs (block #1182).  In this version, the small triangles point away from the block center, as in a Lost Ships block.  

Now I just have to sew my blocks together, turning every other block so that the big vanilla triangles are next to the big brown floral triangles.  Then the borders.  

To be continued ....
0 Comments

Mystery Quilt, Part 6:  Stack the Deck / Roll the Dice

1/7/2009

1 Comment

 
New to this series? Go to Part 1 here.
Random placement of fabric:  it's an interesting concept.

Lots of quilt patterns call for arranging fabrics randomly: all sorts of scrap quilts, charm quilts, and many other multi-fabric designs. Have you ever made one of these?  

If so, tell the truth ... how truly "random" were you? I want to know, because I'm trying to assess my level of obsession.

I simply can NOT bring myself to arrange my quilt patches randomly. Casually, yes. Randomly, never. I might start by tossing all my patches up on the design board, willy-nilly. But then I spend HOURS carefully re-arranging them, seeking some elusive perfection in balance of color, value and texture. Should I seek professional help?

This obsessive tendency really gave me fits with all those randomly-colored bias squares. There were 800 of them! OK, really only 720, after pulling out the corner triangles, then only 640 after pulling out the red ones for the center blocks. That's still a LOT of possible juxtapositions to consider.  

Sewn together into left and right-handed pairs, there are 160 pairs of each persuasion (left & right, that is). These now get combined into little 4-pair stacks of lefties and righties. That will be 2 lefties and 2 righties for each of my 20 blocks, for a total of 80 stacks.  

To be continued .....
1 Comment

Mystery Quilt, Part 5:  Left, Right, Center

1/5/2009

0 Comments

 
New to this series? Go to Part 1 here.
Bleary-eyed as I am from sewing all those hundreds and hundreds of bias squares, now I really need to focus. It's time to start sewing the bias squares together, and I have to be sure to make half of them LEFT-handed, and half RIGHT-handed.

But wait, I almost forgot the CENTER blocks! To create some focus in the center, I need 4 bias squares of the same color for each block. That's 20 blocks times 4 for 80 bias squares of the same color. Oops. I don't have 80 of all the same fabric, not even a dull, ugly one. And I certainly want something relatively bright for the block centers. How about 40 and 40? I find 2 slightly "sweet" reds that will do just fine, then sew these together into little blocks that look pretty much like Broken Dishes.

NOW all the rest of the bias squares get sewn into LEFT and RIGHT pairs. (See the blurry photo above, upper right.)

To be continued ...... 
0 Comments

Off With Their Ears!

1/3/2009

1 Comment

 
With apologies to Vincent, I must say: ears are such a nuisance.

Any quilter who has ever worked with bias squares knows what I'm talking about: those annoying little points that stick out when you press the seam to one side.  Do you just ignore them, or cut them off?

Being lazy to the core, I always ignored them.  Then I started doing my piecing on an antique treadle machine (yeah, it's a hoot!).  The seam gauge is one of those metal bar thingies that sticks up, and the ears don't sail past it smoothly.  What a pain in the you-know-what.

Ah, but then I discovered a positive motivation for trimming my triangle tips before stitching.  For bias squares, it's not such a big deal, since the triangles line up right on top of one another.  But when the triangles are laid crosswise for stitching (think of piecing a long bias strip for binding), I never seemed to align them quite right.

Then I discovered the solution:  just trim exactly 3/8 inch from the triangle points before stitching.  I can cut stacks of them with my rotary cutter.  Voila!  squared-off edges that align perfectly, and NO EARS!

You knew that already?  Well, aren't you just a Miss Smartypants!
1 Comment
    I'm a Craftsy Designer
    Follow
    Benchmark Email
    Email Marketing Services by Benchmark

    RSS Feed

    View by month:

    July 2017
    March 2017
    February 2017
    January 2017
    December 2016
    July 2013
    June 2013
    May 2013
    April 2010
    January 2010
    October 2009
    February 2009
    January 2009
    December 2008


    Categories

    All
    Free Downloads
    Knitting
    Lost Ships
    Mystery Quilt
    Pets
    Pineapple Quilt
    Quilting
    Quilt Marking
    Scraps
    Tips Techniques
    Ugly Fabric

Home                About                  Contact Us                  Privacy Policy                  Terms of Use                  Site Map

Benchmark Email
Email Marketing Services by Benchmark