• Blog
  • Home
  • My Story
  • Patterns
  • Tools
  • Contact Us
 

Indispensable Tips for Precision Quilt Piecing, Part 3: Stitching

1/28/2017

0 Comments

 
All your attention to the details when cutting and aligning will set the stage for a precision piecing performance. Sewing the seam is where you seal the deal. In this article, I'll give you my favorite sewing machine strategies.
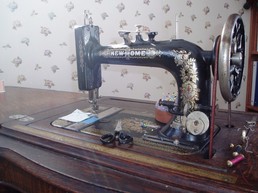
New Home antique treadle sewing machine
"Sylvia," my New Home antique treadle machine.

1. Ease on the Bottom

The concept of ease, while familiar in garment construction, doesn't come up often in patchwork quilting. After all, the pieces of a quilt block are supposed to fit together exactly. Unfortunately, in the real world, that doesn't always quite work out.

In Part 1, Cutting, I talked about fabric grain, and in Part 2, Aligning, observed how mis-matched edge grain will feed through the machine at different rates of stretch. You can think of stretch as being the opposite of ease. In patchwork piecing, ease is the technique to use to counter-act the distorting effect of stretch.
​
To achieve the small amount of ease required to correct to the problem of grain distortion, use this amazingly simple trick. If you are joining two strips, one cut on the unyielding straight grain, and one on the stretchier cross grain, always put the stretchier piece on the bottom. Likewise, a bias edge should always be the under-layer.

Here's how it works: as your fabric passes under the presser foot and over the feed dogs, the feed dogs pull it along while the presser foot pushes back, effectively accelerating the bottom fabric. The effect is enough to ease in a bit of extra fullness without pinches or puckers, very useful in garment sewing.  For quilters, it's a handy trick for curved piecing. 

2. Keep Your Points Cozy

Mariner's compass Quilt Block

​Whether you're sewing a simple 4-patch block or a challenging Mariner's Compass, getting the intersecting seams ("points") to line up exactly is the Holy Grail of precision quilt piecing. 

​With seam allowances pressed in opposite directions (more on pressing next week), it's easy to feel the seams nestle together as you align the patches for sewing. The tricky part is keeping them nestled in that perfectly cozy embrace as they glide through the sewing machine.  

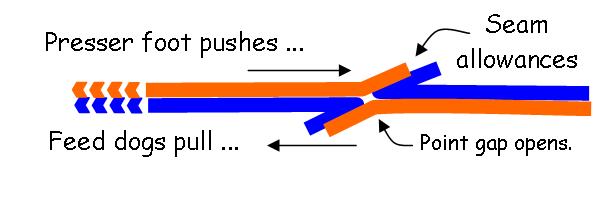
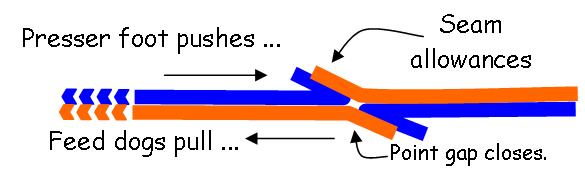
Here again, that push-pull effect of presser foot and feed dogs can either work with you or against you. The two diagrams below show your alternatives in sending the pieced patches through the machine.  (Visualize your fabric in cross-section, traveling from right to left.)

​In the first example, the seam allowances on the top patch are pressed away from the presser foot. You're less likely to have the seam allowances bunch up (at least on top), but look what happens to your nestled seams ... like Romeo and Juliet, they're subject to forces pulling them apart.  It's a quilting tragedy in the making.

Picture
Ah, but if you lean the seam allowances the other way, those same push-pull forces work to tighten the join, and a perfect point emerges.  Don't you love a happy ending? ​
Picture
Now, I recognize that once your seams are leaning a certain way, flipping the fabric over will not change that. But, as the saying goes, fore-warned is fore-armed.  My next tip hints at a way to compensate ...

3. Slow down!

When I started using an antique treadle machine for all my quilt piecing, I noticed right away that ​my piecing precision improved. The reason? At its fastest, the treadle is still slower than an electric machine, giving me time focus on all the details. 

At a slower speed, I also discovered that I can safely sew over pins, a very risky practice at high speeds. If your sewing machine needle comes down squarely on a pin, a bent pin is not your only worry. You also dull the needle, and possibly even break it.  Plus, a tiny fugitive fragment of broken needle can seriously damage your machine.  I still don't advocate sewing over pins in general, but for some tricky point intersections, being able to leave the pin in place is a big advantage. 

4. Measure the seam, not the seam allowance

The more complex your quilt block, the more it will shrink if you over-estimate your 1/4-inch seam. Remember, it isn't the seam allowance that counts, it's the whole seam.  That includes not only the seam allowance, but the width of the thread in the stitching line. 

That, "in the stitching line," bit is important. While the vintage Singer Featherweight is famous for its nearly-perfect straight stitch, in reality, every sewing machine slants its stitches at least a tiny bit. The result is that the stitching line will always be just a bit wider than the thickness of the thread alone. How much wider will vary by machine. 

There's still one more element to add to the seam: the thickness of the fabric. Different fabrics have different thread counts, that is, the number of threads that are woven into an inch. A high thread-count fabric will be woven from finer thread and will be thinner than a fabric with a lower thread count. If that sounds like a silly consideration to you, think about an intersection of six (or more!) points. The multiple layers of fabric involved in the seam start to add up.

Especially if your quilt block is a complex one with lots of seams, it's worth testing your seam width. Cut five 1-inch squares and sew them together end to end. After pressing all seam allowances to one side, the strip should measure exactly 3 inches. Or, if 1-inch squares are too finicky, make them 2 inches. Then you'll get an 8-inch strip. Keep testing and adjusting until it's perfect, then mark it on your throat plate with tape.

Stay Tuned for Part 4 of ​Indispensable Tips for Precision Quilt Piecing.
Next week, I'll wrap up this series with a few tips on pressing, PLUS how to make your own aircraft-carrier sized pressing table.
​
0 Comments

Indispensable Tips for Precision Quilt Piecing, Part 2: Aligning

1/21/2017

0 Comments

 
Your quilt patches are all cut.  (If not, go back and read Indispensable Tips for Precision Quilt Piecing, Part 1: Cutting.)  Now you just grab those patches two at a time and sew them together.  Simple as that.  

Well, not quite. Before you can sew them together, you have to line them up, and exactly how you line them up before sewing can make a big difference in how well they are lined up after sewing. Here are my top 3 tips to help:

1. Align the Whole Patch, Not Just the Edges

Sitting at my sewing machine with a stack of strips to sew, I used to just pick up a pair, hold them up in front of me while lining up the seam allowances, then sew.  It was simple.  It was fast.  It was not particularly precise. 

Until they are actually sewn together, locked in place by a line of stitching, two pieces of fabric can, and very often will, move.  Pinning can help, but seriously, we all  know that nobody wants to pin every seam.  

​My preferred solution is to use the friction of fabric against fabric to help prevent slippage. So put those two patches down on a flat surface, line them up nice and square, and smooth them together. Less slipping is guaranteed.
​

2. Cut Corners

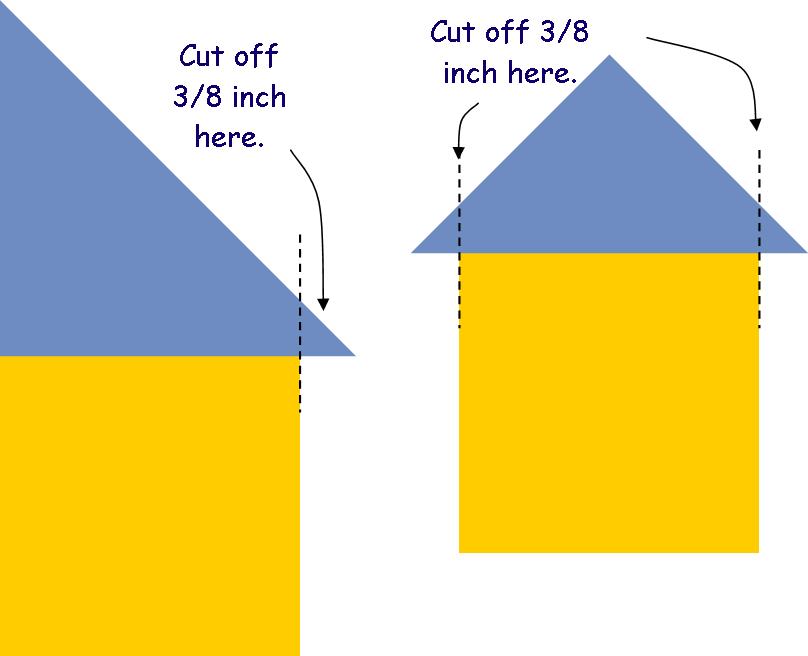
We all love a good shortcut technique, but this isn't one of them. The corners we're cutting here are the excess points on triangular patches, what are commonly called "ears."  

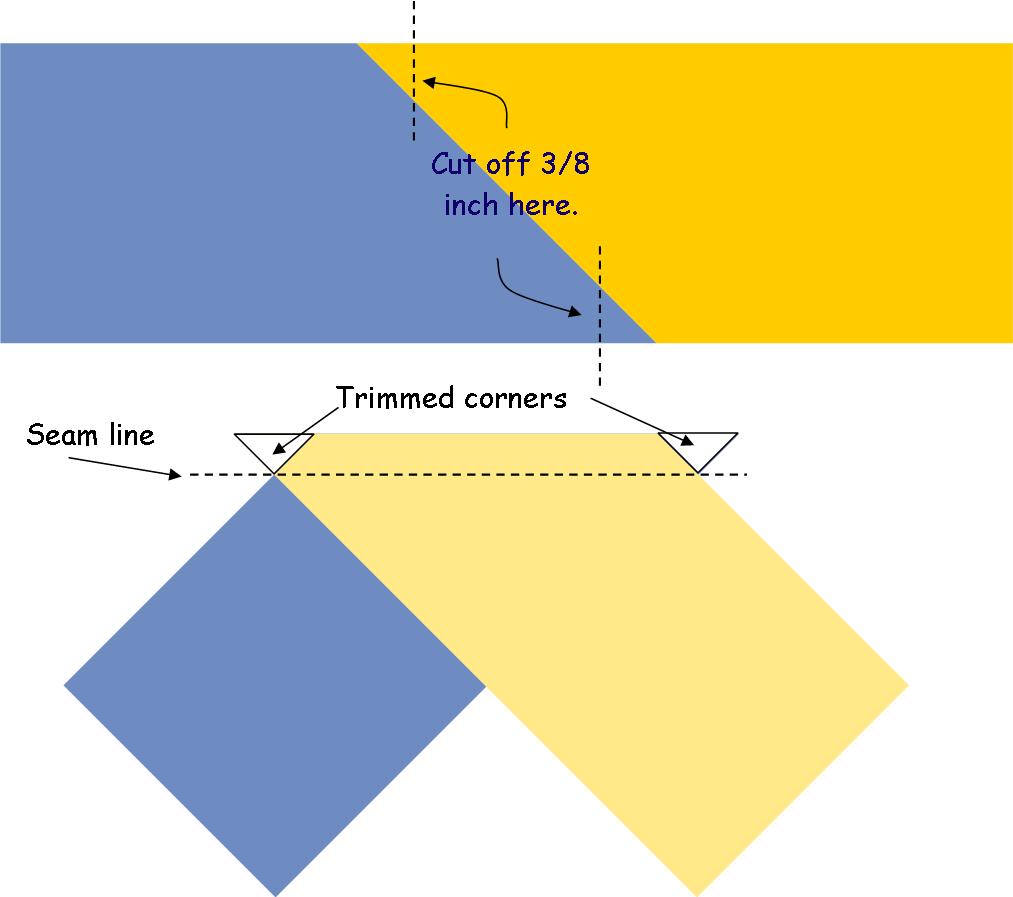
When you're sewing half-square triangles (HSTs) together into squares, there's no problem: the whole patch lines up. But if you're sewing a square side of just one triangle to a rectangular piece, there's that ear sticking out. Not such a big deal, but it gets more complicated. Think of the diagonal piecing of a long border strip.

We all know that HSTs need to be cut 3/8-inch larger than the square they will form after sewing.  (And if you didn't know that, now you do.) So trimming off that 3/8-inch triangle tip will square up the seam.  The trick is knowing which direction to cut.  A picture is worth a thousand words, so here are some diagrams to make it all perfectly clear.
Picture
Picture

3. Match the Fabric Grain

​Picture this: you're seaming two identical quilt patches, nothing tricky here, just plain ol' rectangles. You feed them through your sewing machine with the edges perfectly matched at the start, but somehow, in that 4 to 6 inches of stitching, something has gone wonky, and the edges are not perfectly matched at the end of the seam.  What happened?

Chances are, this is a case of mis-matched fabric grain.  As I described in Part 1: Cutting, the cross grain of the fabric will have a bit of stretch, while the straight grain will not. Often, this difference in fabric stretch is enough to make two fabric edges distort at different rates as they pass under the presser foot. Two edges that were exactly the same length before sewing no longer match after sewing. The longer the seam, the more pronounced the distortion will be.

You can avoid this effect when sewing strips together, by making sure to match edge grain. That is, sew two straight-grain edges together, or two cross-grain edges.  In cases where matching grain is not possible, there are some simple ways to minimize grain distortion while sewing.
​

Coming Up Next ...

I'll talk more about sneaky cures for grain distortion, how to get perfect points, and the pursuit of the elusive 1/4-inch seam in my next post, Indispensable Tips for Precision Quilt Piecing, Part 3: Stitching. 

Subscribe to my email list below to notified!
​
0 Comments

Indispensable Tips for Precision Quilt Piecing, Part 1: Cutting

1/14/2017

0 Comments


Precision Piecing, Broken into Parts

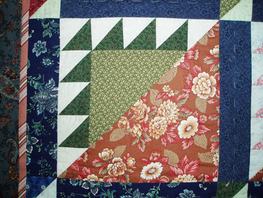
Precision quilt piecing
There's more to perfectly precise quilt piecing than a steady 1/4-inch seam. In fact, sewing the seam is the third step in what I consider the 4 components of precision quilt piecing: 

  1. Cutting
  2. Aligning
  3. Stitching
  4. Pressing

​(I tried to come up with another word for Cutting that starts with a "G" so that the 4 steps would spell G.A.S.P., but somehow "Gouging" didn't feel quite right.  I'm open to suggestions.)
​

Component 1: Cutting

My grandmother, Edna Bannister Weitkamp, made all her beautiful quilts without the benefit of a rotary cutter and transparent ruler.  I remember her marking out cutting lines on her fabric with a ball-point pen, using cardboard templates cut from empty cereal boxes.  For curved piecing, I still use her method, though I swap the ball point pen for a very sharp pencil. ​

Luckily for us, we quilt in the age of the rotary cutter, gridded cutting mat, and transparent ruler.  Volumes could be (and probably have been) written about tricky techniques for all the specialized rulers available. For this article, I'll just focus on the rotary cutter, and the one essential rule of rotary cutters: keep it sharp!

Slash the rotary cutter
To keep your rotary cutter in top condition, treat it as you would your best pair of shears: use it only to cut fabric, never paper.  Just as with scissors, cutting paper with your rotary cutter will dull the blade. 

And never, ever use it to trim window screen when you're repairing the screen door!  No, not even the vinyl screen, and certainly NOT the aluminum stuff.  Aluminum screening will make little notches in the blade that will leave "skips" of un-cut threads in your fabric.  Don't ask me how I know that.

​When your rotary blade starts leaving "skips," whether due to abuse or long use, it's time to replace it.  Dispose of the old blade safely (I wrap mine in masking tape), or put it in a box clearly labeled, "old blades for cutting paper and window screen."

Whether you're cutting with scissors or a rotary blade, it's generally not a good idea to try to cut too many layers of fabric at once.  Cutting too many layers will be likely to cause distortion from friction drag.  For scissors, the cautious maximum is 2, or 4 for a rotary cutter. 

Fabric grain is also an important consideration in cutting.  All woven fabric has 3 distinct grains, or directions in the weave.  The straight grain is along the length of the fabric, that is, parallel to the selvages.  In this direction, fabric will have virtually no stretch.  The cross grain runs from selvage to selvage.  Fabric stretched across the grain will give a little, then return to its original shape.  Bias refers generally to any diagonal cut, or more precisely to a 45-degree angle. Fabric has maximum stretch on the bias, but will not return to shape after stretching.

The different stretch characteristics of the 3 fabric grains come into play in a big way in aligning, the second component of precision quilt piecing.  For cutting, what's important to note is that your strips and patches should be cut square with the fabric grain.  

In general, it's best to cut strips across the grain.  That is, the long side of the strip should be on the cross grain.  Of course, yardage limitations will sometimes dictate straight-grain strips.  I'll discuss that further in the next article, Indispensable Tips for Precision Quilt Piecing, Part 2: Aligning. 

Subscribe to my email list below to notified!
​
​​
0 Comments

The Zen of Un-doing

1/11/2017

0 Comments

 
Ah, relaxation.... This afternoon, I put on some favorite music, poured a steaming cup of tea, and settled in to "frog" an unwearable disaster of a sweater that I'd spent the last two weeks knitting. (Rip-it! Rip-it!)

Now, ripping out knitting is not nearly so tedious a chore as ripping out a sewn seam. With knitting, you just unfasten the last stitch, tug on the yarn end, and the whole thing unravels, zzzip! Even so, when there's 900 yards of yarn to pull out and re-wind into balls, it takes a bit of time.
 

Seam ripper
Regardless of the tedium factor, for knitting or sewing, the basic equation of ripping-out remains the same:
 
​Time spent doing
+ Time spent un-doing
= Effort with nothing to show for it.
​

I'm not a perfectionist. (Don't believe those ugly rumors you've heard about me.) Often enough, when I've done my best, it still isn't perfect.  Actually, with knitting, that's nearly always! What's important to me is making every project the best I can make it. Doing-over in order to do it better keeps moving my personal "best" that much closer to "perfect."

​Some of my friends think I'm crazy, but here's my "Zen" philosophy of ripping out:  

In life, when I take a wrong turn, make a bad decision, or otherwise make a mess of things, I have to live with the consequences. Not so in knitting! There, I get a do-over. In fact, I get as many do-overs as I want, and that makes me a very happy frog. 
​
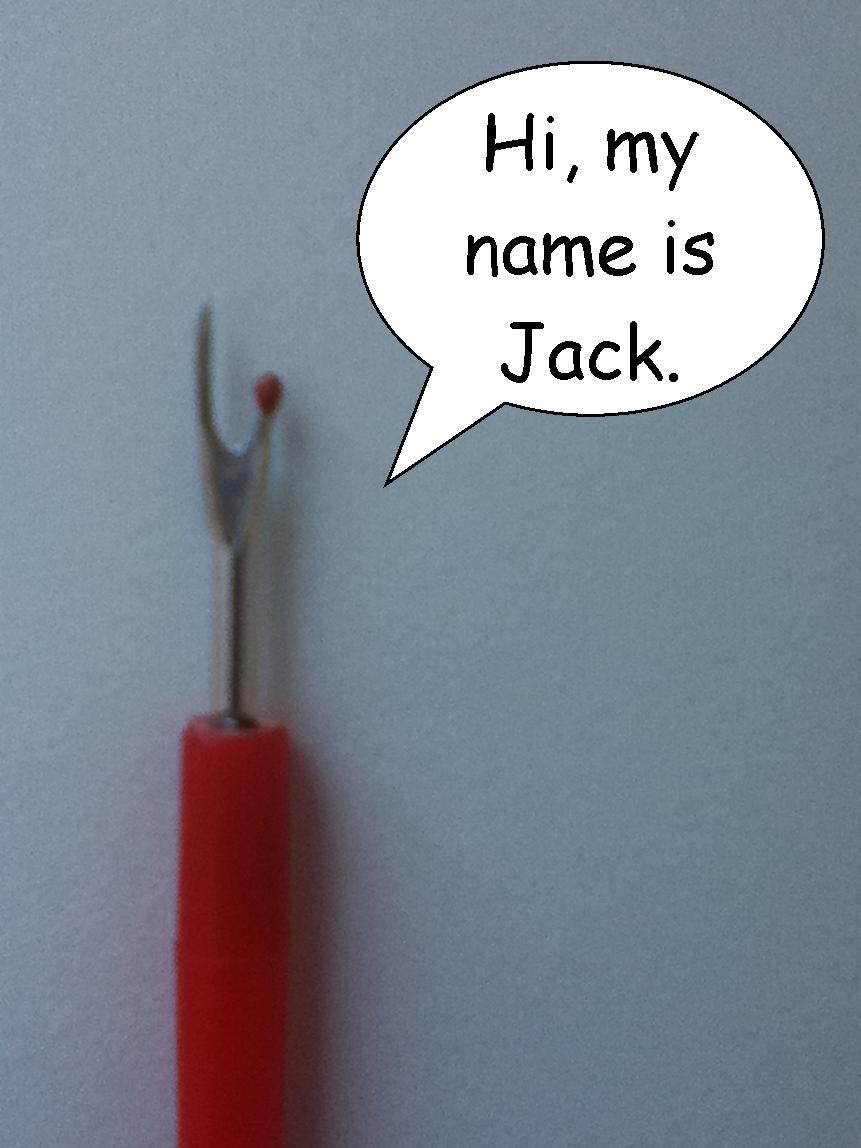
​Obviously, ripping-out is never ideal.  We'd all ​much prefer to get it right the first time. That's especially true in quilting (even if you've got your pal, "Jack" standing by to help).

In the coming weeks, I'll be sharing some of my favorite tips for precision quilt piecing, to help you get it right the first time, and every time.  Be sure to subscribe to my email list so you don't miss a thing.
​

0 Comments
    I'm a Craftsy Designer
    Follow
    Benchmark Email
    Email Marketing Services by Benchmark

    RSS Feed

    View by month:

    July 2017
    March 2017
    February 2017
    January 2017
    December 2016
    July 2013
    June 2013
    May 2013
    April 2010
    January 2010
    October 2009
    February 2009
    January 2009
    December 2008


    Categories

    All
    Free Downloads
    Knitting
    Lost Ships
    Mystery Quilt
    Pets
    Pineapple Quilt
    Quilting
    Quilt Marking
    Scraps
    Tips Techniques
    Ugly Fabric

Home                About                  Contact Us                  Privacy Policy                  Terms of Use                  Site Map

Benchmark Email
Email Marketing Services by Benchmark